|
Train Trek Layout Simulation™ Simulate and Run Your Layout |
|
|
|
|
|
Simulate and Run Your Layout |
|
|
Train Trek Layout Simulation™ (LS) enables an easy layout simulation and activation! User can manually control trains, turnouts and accessories. In addition Train Trek Layout Simulation™ (LS) provides a time table feature with endless possibilities to automate your layout. First, simulate it and then run it live! The current version supports Marklin Digital system.
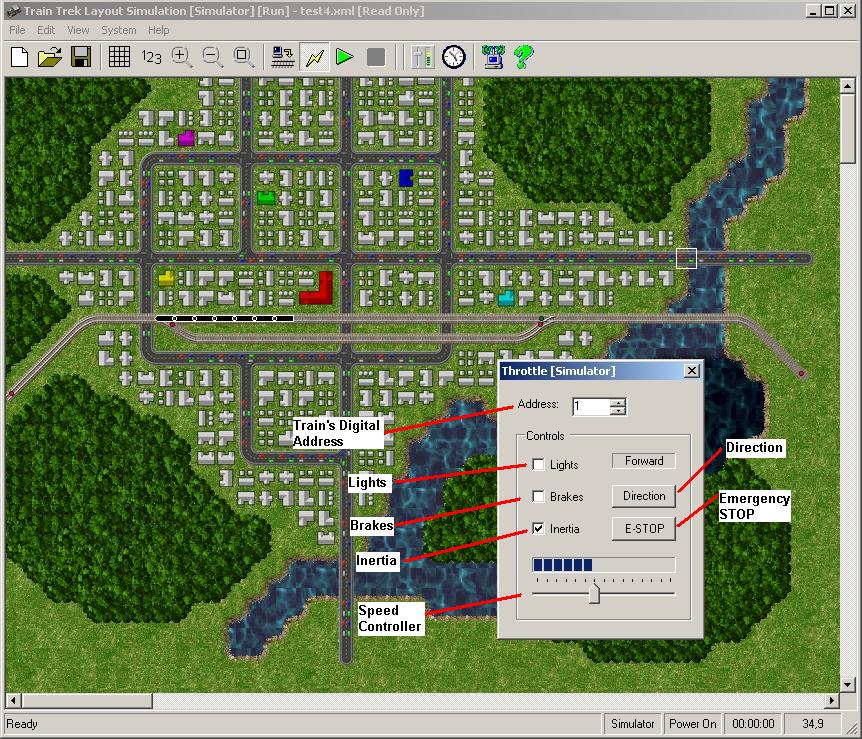
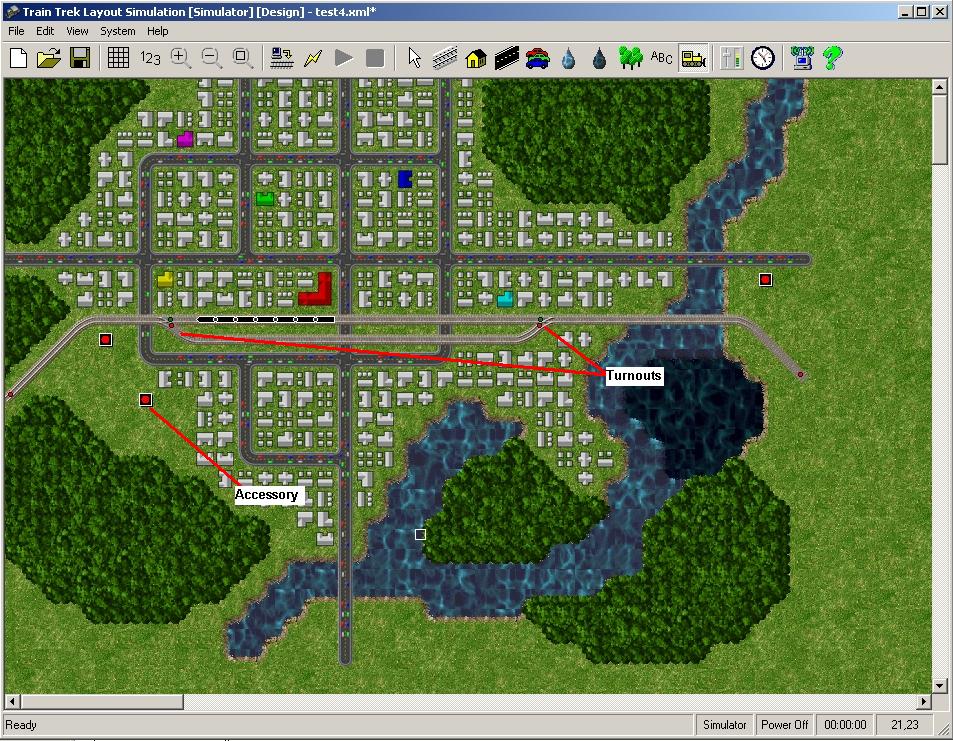
1. Trains Control - Click on the Throttle button or use the option 'Throttle' from the 'View' pull-down menu. The throttle panel will open. Speed Control - Move the Speed Controller slide to increase the train's speed. Lights - Click on the Lights check Box to turn the Lights ON/OFF. Brakes - Click on the Brakes check-box to stop the train. If the Inertia check-box is checked, the train will slow with a momentum. Direction - Click on the Direction button to change the train's direction. If the Inertia check-box is checked, the train will stop first, and then change direction with a momentum. Emergency STOP - Click on this button for immediate stop of all trains. 2. Turnouts - This features enables the user to change turnouts position. (Straight/Curve) Simply double-click on the turnout in the layout to change it's position. Another double-click to change it's position again. 3. Accessories - This features enables the user to change accessories position. (ON/OFF) Simply double-click on the accessory in the layout to change it's position. Another double-click to change it's position again.
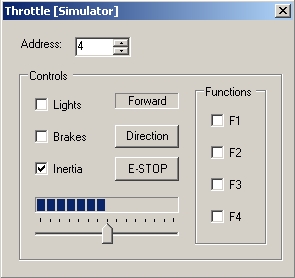
3. New Throttle Panel - This features enables the user to control trains functions or functions decoders. For example: F1 may be used for Sound or Smoke. F2 may be set for horn or bell sound. User may activate/deactivate these functions simply by check/un-check the F1-F4 check-boxes.
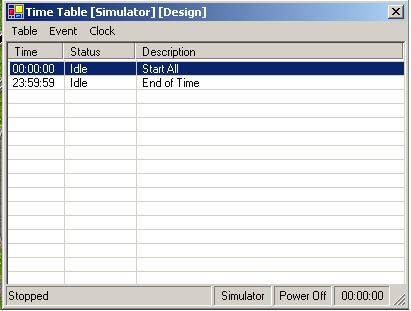
Time Table AutomationTime tables can be used to automate most layout operations. A time table is a collection of events that are configured to occur at fixed times. When an event occurs, a list of commands is executed. For example, at 00:03:12 (three minutes and twelve seconds into the schedule) you may want to move turnout number 14 to the curved position, start locomotive number 7 at a velocity of 9, and bring it to a stop when sensor number 3 is activated. To open the time table, select View / Time Table from the main menu. The time table has its own menu and columns to display the time, status, and description of the events.
Figure 1 - Time Table
Time table events may be in any one of the following states: Idle All events are idle when the clock is stopped. Pending Clock has not reached the time for this event. In Progress Event is executing its list of commands. Complete Event is done executing its list of commands. These states are displayed dynamically in the status column of the time table. When the clock is started, all events will switch to Pending state. As the clock runs, events will switch to In Progress state and then Complete. If the command list is short, an event may appear to switch directly from Pending to Complete. Table MenuThe table menu allows you to import and export time tables. New Deletes all events from the time table. Import Imports a time table. Export Exports the time table. Close Closes (hides) the time table. Time tables are normally stored along with the layout but may also be imported and exported individually. This allows you to have many different time tables for a given layout. Event MenuThe event menu allows you to edit the time table event list. Insert Inserts an event into the time table. Delete Deletes an event from the time table. Properties Opens the event properties dialog for an event. These items are also available through a context menu by right-clicking the time table. Events may be inserted and deleted with the Insert and Delete keys. Double clicking an event will bring up the event properties dialog for that event. Clock MenuThe clock menu allows you to start and stop the time table clock. Start Starts the time table clock. Stop Stops the time table clock. Clock Delay Clock delay is in seconds. Clock Reset Clock reset allows to loop the time table. Just add the clock reset command and set the event time to when you want to repeat.
Make sure that everything is
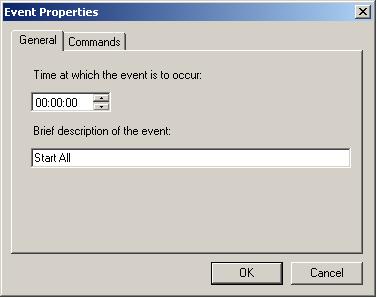
back to home position before you reset the clock. The clock can also be started by selecting System / Start Clock from the main menu or by clicking the Start Clock button on the tool bar. Likewise, the clock can be stopped by selecting System / Stop Clock from the main menu or by clicking the Stop Clock button on the tool bar. The clock is automatically stopped when either the layout connection or layout power selections change state. The clock start and stop selections will only be available when layout power is active. Stopping the clock causes all locomotives to stop as well. Event PropertiesThe event properties dialog allows you to enter or edit the properties of an event. Information is grouped into a general tab and a commands tab. General TabThe general tab of the event properties dialog has fields to enter the event time and description.
Figure Event Properties - General Tab Time - The time field allows you to enter the time at which the event is to occur. Time is in hours, minutes, and seconds from when the time table clock is started. Events are sorted by time. Events that occur at the same time are sorted alphabetically by description. When you insert the first event, the time defaults to zero. If you insert an event with an existing event selected, the time defaults to the time of the selected event. Description - The description field allows you to enter a brief description of the event. The description is displayed in the description column of the time table. It has no functionality other than to serve as a reminder of what happens when the event occurs. Commands TabThe commands tab of the event properties dialog allows you to edit the list of commands that are to be executed when the event occurs.
Figure 3 - Event Properties - Commands Tab The following buttons allow you to edit the command list: Insert Inserts a command. Delete Deletes a command. Properties Edits a command. Move Up Moves a command up. Move Down Moves a command down.
Command PropertiesThe command properties dialog lets you enter the device, address, function, and data that make up a command.
Figure 4 - Command Properties
There are three different devices that a command can target. These devices are locomotives, turnouts, and sensors. The available functions differ based on the selected device. Functions may or may not have data associated with them as follows: Device Function Data Notes Locomotive Forward Velocity (0-14) Reverse Velocity (0-14) Stop None Lights 1 = ON, 0 = OFF Turnout Straight None Curved None Accessory ON OFF Sensor Wait None (1) Notes
|
|
| Tayden
Design Technical Publications Copyright © 2010 Tayden Design, Inc. All rights reserved. Revised: April 01, 2010 |
|